Textile Printing Process Flow Chart
Textile Printing Process Flow Chart
Introduction
Textile Printing involves localised colouration. This is usually achieved by applying thickened pastes containing dyes or pigments onto a fabric surface according to a given colour design. In particular, the viscosity of a print paste is critical. It determines the volume of paste transferred to the fabric and the degree to which it spreads on and into the surface yarns. The paste must colour all the visible fibres on the printed surface, so it must penetrate somewhat into the yarn structure. If the paste is too 'thin', it will spread, giving poor print definition, and penetrate too far into the yarns decreasing the colour yield.
Printing was originally done by hand using wooden blocks with a raised printing surface, much as children do potato printing. The two main techniques used for transferring paste onto fabrics involve engraved rollers carrying paste in the recesses corresponding to the colour pattern, or screens with the open mesh in the pattern areas. There will be one roller or screen contacting the fabric surface for each colour to be printed.
The most important printing method today is pigment printing. This involves printing the coloured pattern onto the fabric surface and curing the printed areas by heating them in air. The print paste contains coloured pigments and a binding agent. On curing in hot air, the binder forms a solid film of transparent polymer that holds the pigments in place on the yarn surfaces. The great advantage of pigment printing is that the fabric does not require washing after the fixation process.
Soluble dyes used in printing fabric are of the same types as those normally used to dye it a solid colour. Apart from pigment printing, the usual sequence of operations is printing, drying, steaming and washing. Dyes for printing must have high solubility because there is only a limited amount of water in a thickened print paste and after drying the dyes must re-dissolve in a limited amount of condensed steam. The paste must dissolve the dyes to allow their diffusion into the fibres. It will also contain all the other required chemicals for fibre wetting and dye fixation. The final washing removes the thickening agent, unfixed dyes and other auxiliary chemicals from the printed surface. During washing, the dyes
removed mustn't stain any white ground or other printed areas. For this reason, dyes for printing often have relatively low molecular weights substantivity is not very high. When a manufacturer sells the same dye for both dyeing and printing, the two product formulations will invariably be different. Pigment and dye printing are both direct printing methods. Two other so that their
important indirect printing methods called discharge and resist printing also give coloured designs. In discharge printing, a uniformly dyed fabric is printed with a paste containing chemicals that destroy the colour leaving a white pattern. If the paste contains other dyes, stable to the chemical that discharges the ground colour, they can dye the treated area. In this way, multi-colour effects are also possible. In resist printing, the fabric is dyed after printing. The printed areas resist dye absorption so these design areas are reserved. After removal of the resist agent, the design may be white or coloured if other dyes and appropriate chemicals were present in the original paste.
The rapid development of CAD computer systems for print design has had a significant impact on this activity. The development of digitised textile printing using, for example, inkjet printers is well underway. Such computer-assisted manufacturing will considerably influence the textile printing industry shortly. Its other preoccupation, as for the dyeing industry in general, is that of reducing the amounts of biodegradable and potentially harmful chemicals in the effluent leaving the works so that its environmental impact is limited.
FLAT SCREEN PRINTING
Printing techniques
Screen printing is an extension of the technique of stencilling in which a coloured image arises from the transfer of colour through open areas in the sheet placed upon the fabric surface. In flat-screen printing, the screen consists of a woven polyester material, tightly stretched across the underside of a light, rectangular frame. During printing, the screen usually lies across the fabric width. The polyester fabric only allows the printing paste to pass through the mesh in those areas corresponding to the design being printed. A suitable coating blocks the remaining areas. There is a screen for printing each colour and each successive screen sits on the fabric in the exact position for accurate registration of the multi-colour design.
In manual screen printing, the fabric lies on a long table on top of the printing
blanket. This blanket is typically a cotton/polyester cloth, water-proofed by a coating of neoprene rubber. If the fabric slips or deforms during printing, there is a loss of print definition. The fabric is therefore usually pinned to the printing blanket, or stuck onto it with a water-based gum or thermoplastic adhesive. The latter type coats the blanket surface but only becomes sticky when heat softens the polymer. After printing, the fabric and printing blanket separated. Washing the blanket removes any gum and dye paste transferred through the cloth or beyond its edges. Thermoplastic adhesives are resistant to repeated washing and very durable when using water-based printing pastes. Beneath the printing blanket are several layers of cloth forming a uniform cushion called a 'lapping'. In some cases, a 'back-grey' cloth is inserted between the fabric and blanket. This grey cotton fabric absorbs any paste that transfers through the fabric and thus avoids smudging of colour on the back of the printed fabric. If used, it too must be washed and dried for re-use.
The printing paste is poured into the screen that sits on the fabric surface. Drawing a flexible rubber blade called a squeegee across the inner surface of the screen spreads the viscous dye paste and forces it through the open areas to print the fabric beneath. Two or four strokes across the screen are usual, the number depending on the porosity of the screen and the paste viscosity. Each passage of the squeegee should transfer the same amount of paste to the fabric in any given print. The angle, speed and pressure of the squeegee must therefore be the same for each print.
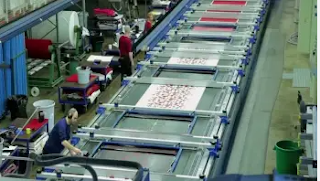 |
| Fig: Flatbed Screen Printing Machine |
In semi-automated screen printing, a mechanically driven squeegee transfers the colour. This often has a pair of parallel rubber blades, with the paste held between them. When passing across the screen during printing, only the trailing blade is in contact with the screen surface. At the end of the stroke, the leading blade drops and the trailing blade rises ready for the back stroke. This eliminates the need to lift the squeegee over the residual paste at the end of each stroke. The Zimmer rolling rod applicator moves across the printing screen along the length of the fabric, driven by an electromagnet under the blanket. The roller is small enough that paste can flow over it so lifting is not necessary. This type of roller gives less screen wear.
In manual and semi-automated screen printing, the end of each screen rests against a guide rail running along the table edge. The screen fits against a 'stop' that defines its position relative to the fabric. The screen for a particular colour gradually moves down the fabric length, fitting against the appropriate 'stop' as each repeat is printed. 'Pitch marks' printed on the fabric selvedges will verify the alignment of the screen for the next colour. Printing the entire length of fabric on the table with one colour design allows some intermediate drying before the application of the next colour. The next screen does not then crush or mark the paste layer already present so that the images are sharper.
In fully automated flat-screen printing, productivity is higher. The screens for each of the colours have the correct positions on the guide rail for the exact registration of their patterns. After printing all colours simultaneously, the screens are lifted, and the printing blanket moves the fabric stuck to it so that a printed pattern has the correct position for printing the next colour. Clamps securely hold the sides of the blanket and they move the fabric by the exact required distance after each print. The spacing between individual screens is usually one pattern repeat. Thus, if a screen has two pattern repeats, and screens are spaced one pattern repeat apart, the blanket must move the fabric two pattern repeats down the table. In this way, gaps are avoided. Correct fabric placement is vital for accurate registration of the different coloured patterns. In general, a slight pattern overlap prevents a white gap between two printed colours.
At the end of the printing table, the fabric separates from the blanket and passes into the dryer, while the blanket is washed, dried and recycled beneath the printing table. Various mechanical devices compensate for the intermittent movement of the fabric during printing but allow uniform movement of the fabric during drying, and of the blanket during washing.
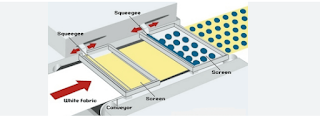 |
| Fig: Flatbed Screen Printing |
Figure: Screen placement and fabric movement as a function of repeat size in automated flat screen printing
The main fault in screen printing is poor pattern registration. This arises from inaccurate screen placement or fabric movement, from the fabric slipping on the blanket because of poor adhesion, or from distortion of the screen mesh by the drag of the squeegee. Marks on areas already printed are caused by the frame crushing the paste beneath it while the paste is still moist. This is more of a problem in fully automated screen printing where colours are printed one after the other with little time for drying the deposited paste. For this reason, printing of large areas of colour (blotches) is usually done last.
Off-contact printing minimises squeegee drag and frame marks. For this, the frame is not quite in contact with the fabric. The pressure of the squeegee forces the screen material to stretch slightly so that it touches the fabric and the paste transfers. "Splashing' of colour is caused when the paste beneath the screen initially sticks the screen to the fabric. When the screen is lifted quickly, the colour is splashed outside the printed zone as the paste on the fabric separates from that on the screen. Gently lifting the screen from one end and then the other avoids this, although it slows down the process.
Flat screen printing with large screens allows much greater print repeat sizes than is possible using engraved copper rollers (Section 23.4) or rotary screens (Section 23.3). Forcing the paste through the screen openings involves much lower applied pressures than in roller printing, so there is less penetration of paste into the fabric. This results in higher colour strength and less crushing of any fabric texture. Flat screen printing is, however, relatively slow and is now only used for materials such as high-quality furnishing and fashion fabric
Flat screen production
Screen production for printing is the culminating step in a process involving many important aesthetic and technical decisions. These include:
(1) the selection of the fabric and the printed design;
(2) the choice of the size and arrangement of the design's repeat rectangle;
(3) the necessary colour separation of the design.
These steps are common to all printing methods. Colour separation involves reproducing the pattern for each colour on separate clear films (diapositives). Much of the design work is now computerised. The designer must ensure the printing of colours with a slight overlap to avoid white gaps between them. In some cases, printing of one colour on top of another produces a particular colour effect. This is known as a fall-on.
The same technique of screen production is used for both flat and rotary screens. The flat screen, mounted on its frame, is coated with a solution of a photo-sensitive polymer that will crosslink and harden on exposure to ultraviolet light. It will then be insoluble. A typical polymer is a polyvinyl alcohol, its crosslinking sensitised by ammonium dichromate. The coated screen is dried and then exposed beneath the diapositive for the given colour. All operations take place in a darkroom. The inked zones, corresponding to the particular colour pattern, do not transmit ultraviolet light. The layer of polymer on the screen beneath the way is thus not exposed and does not crosslink while the rest hardens. The non-exposed polymer remains soluble and can be washed out, leaving the screen open in those areas. The print paste will pass through the screen where the unexposed polymer washed away but not through the regions where the polymer has hardened and become insoluble. Any small pin holes in the hardened areas on the screen are painted over. A coating of cellulose of polyurethane lacquer reinforces the screen, the excess being sucked out of the open areas. In some cases, thermal or radiative curing of the polymer makes it more complicated and more resistant.
A flat-screen may be produced in a single coating and exposure operation. Alternatively, in the step-and-repeat process, one repeat design is produced per exposure, and the remainder of the screen is protected by dark paper. The pattern or the screen is then moved by one repeat distance and the process is repeated. The screen mesh varies from about 60 up to 150 holes per linear inch depending upon the type of pattern and the fabric. There is always a tendency for the edges of printed areas to have a serrated appearance. This comes from the
arrangement of the spaces between the threads along the edge of an open area of the screen. The spreading of the paste below the screen threads reduces this, aided by using fine screens and lower-viscosity pastes.
ROTARY SCREEN PRINTING
In rotary screen printing, coloured paste is forced through the open areas of a cylindrical printing screen that rotates as the fabric moves beneath it. In contrast to intermittent flat screen printing, rotary screen printing is fully continuous with fabric speeds up to 50 m min", if adequate drying capacity is available. Rotary screen printing is now by far the major printing method for textile fabrics.
The printing blanket is shorter than in flat screen printing because cylindrical screens occupy less fabric length. Their diameter is # or 3.14 times less than their circumference. The use of a thermoplastic adhesive on a neoprene-coated blanket is common since this simplifies washing. A pump delivers paste from a container into a central pipe that runs inside the full length of the screen. This pipe also supports the squeegee. The paste runs down onto the rotating screen from holes in the pipe. These are larger towards the far end to give even paste distribution The paste collects under the stationary squeegee, which forces it out through the holes in the rotating screen. This is the opposite of flat screen printing where the movement of the squeegee forces the paste onto the fabric. The squeegee is a flexible stainless steel blade since rubber squeegees wear away too quickly. The blade curvature depends on the applied pressure and can be varied by adjustment of the side bearings. Uniform blade pressure across the width of the screen is essential to ensure an even transfer of the paste to the fabric. Printing machines from Zimmer use an electromagnetic roller squeegee.
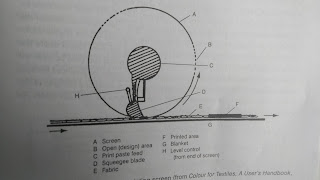 |
| Fig: Interior of a rotary printing screen |
The screens are strong enough for rotation provided they are under tension along the cylindrical axis. They fit onto light aluminium end rings that can be driven from either one or both sides. The blanket and screen drives are usually linked. Once the screens are in place the paste delivery tubes and squeegee assemblies are fitted. On starting to print, the screen height can be adjusted and the screens can be advanced or retarded to give correct registration of the pattern.
Direct rotary screen printing does not allow the large repeats of flat screens. Large repeats can, however, be printed by automated intermittent raising and lowering of the rotating screens. In this way, two or three different rotating screens print the same colour to give a large repeat. Only a portion of the screen surface is open so that when the screens are raised the paste is held in a closed area and does not drip onto the fabric.
Lacquered rotary screens, originally from Stork, usually have a pattern of hexagonal holes. The holes have sloping walls, being larger on the outside of the screen than on the inside. They are manufactured by electrodeposition of nickel onto an engraved mandrel. The mandrel is the cathode and the anodes are pieces of nickel submerged in the plating bath of a nickel salt. Hexagonal recesses are first carved into the thin copper layer on the mandrel surface and filled with an insulating polymer. The exposed copper is then lightly nickel-plated and the recesses are again filled in with insulating polymer. The nickel layer may then be oxidised with chromic acid to produce an oxide layer. This avoids the adhesion of the nickel deposit to the mandrel in the final plating step that follows (Figure 23.3). No nickel deposits in the areas around the insulating polymer. This is where the hexagonal holes will be. The 0.1 mm thick screen of nickel can then be removed from the mandrel and rinsed. Very fine mesh screens cannot be produced because of the problem of bridging across the insulating polymer zones and filling the holes as the nickel layer becomes thicker. Typical screens are 60 mesh (holes per linear inch) for blotches and 80 mesh for outlines.
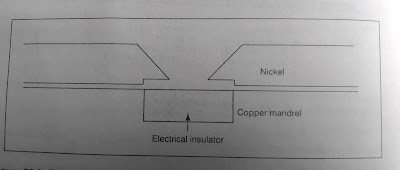 |
| Fig: Electroplating of a Nickle Screen |
Photopatterns are produced similarly to those for flat screens but using a single full-scale positive film for each colour. The colour positives are prepared by the step-and-repeat process using multiple exposures from a negative of the original repeat. Screens may be hand-coated with several layers of light-sensitive polymer or single-coated with a special annular coating machine. The types of polymers used, such as melamine-formaldehyde condensates, are also different from those used for flat screens since good adhesion to the nickel surface is essential. The polymer-coated. I screen is placed on an inflatable rubber tube and wrapped with the diapositive film, great care being taken to place it in exactly the correct position. The seam is usually helical to avoid sideways slippage. The inflated rubber tube holds the screen onto the film and the whole rotates during exposure to ultraviolet light. Washing then removes unexposed soluble polymer from what will be the open areas. After drying, any pin holes are touched up with lacquer and the residual polymer is heat cured to completely harden it. Finally, the end rings are carefully fitted.
Galvano screens from Zimmer have solid electrodeposited nickel layers in the filled zones in place of lacquer and are therefore much stronger and less susceptible to pin holes. A thin inflatable nickel tube is coated with photo-sensitive polymer solution and dried. A full-size negative of the colour separation is wrapped around this followed by a negative of the mesh pattern. Inflation of the mandrel provides good contact between the layers during exposure to ultraviolet light. After washing and drying, only the non-pattern areas and the areas corresp
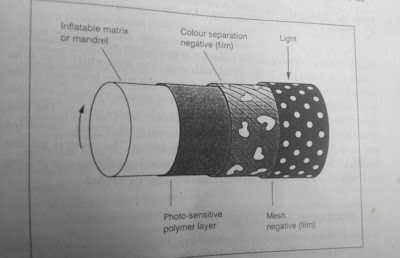 |
| Fig: Arrangement of films for producing a Galvano nickel screen |
coating of hardened polymer. The latter acts as an insulator when the mandrel is subsequently nickel-plated. The nickel builds up in those areas where there is no hardened polymer. The result is a thin nickel sheet with screen holes only in the areas of the design. Bridging across the tiny insulated zones is a problem with this type of screen and they do not have a mesh as fine as lacquered screens. The limit is about 80 mesh, in contrast to 100 mesh for lacquered screens. Lacquered screens are preferred for finer work and narrow fabrics. The stronger Galvano screens are better for wider fabrics and for the more mechanically rigorous printing of carpets where more robust, thicker screens (0.4 mm) are needed.
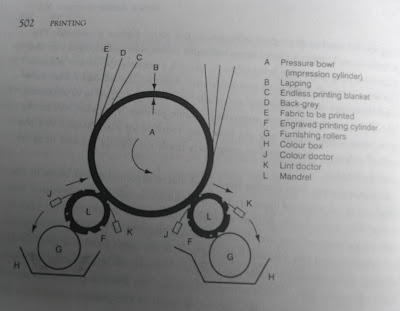
A -Pressure bowl(impression cylinder)
B -Lapping C Endless printing blanket
D.-Back-gray
E -Fabric to be printed
F -Engraved printing cylinder G Furnishing rollers
H -Colour box
J -Colour doctor
K -Lint doctor L Mandrel
ENGRAVED ROLLER PRINTING
Engraved roller printing is over 200 years old and the technique has changed little during this period. The figure illustrates the essential details of the process. Printing takes place around a large rotating roller or bowl. The outer layer on the bowl is the fabric being printed by the transfer of coloured paste from the recesses. in the engraved rollers pressing against it. The fabric covers about 50% of the circumference of the bowl. It is on top of and in contact with the continuous printing blanket. This is typically a cotton/polyester cloth water-proofed by a coating of neoprene rubber. The blanket and printed cloth separate after printing and the blanket is washed and recycled. Beneath the printing blanket, the entire bowl has up to a dozen layers of wool or wool/linen 'lapping'. A continuous 'back-grey' of unbleached cotton may be inserted between the printing blanket and the fabric. It too must be washed, dried and returned to the printing bowl.
For a multi-colour print, there is a colour box and engraved roller for each colour, placed around the lower part of the bowl. The supporting framework must be robust since pressures as high as 22 000 lb in2 (140 kg-cm) push the engraved rollers onto the moving fabric on the bowl. This causes each engraved roller to rotate at the same linear speed and forces the fabric into the grooved recesses carrying the printing paste. Exact placement of the engraved rollers is essential to ensure accurate registration of the different coloured patterns in the correct position on the fabric. This is referred to as pitching.
A cloth- or brush-covered furnishing roller transfers the dye paste from a small colour box onto the engraved roller. A steel doctor blade, in contact with the engraved roller, scrapes the smooth copper surface clean, leaving paste only in the engravings. This blade moves to and fro across the print roller face to give even wear. After the transfer of the paste from the roller to the fabric, a brass lint doctor cleans the engraved roller. This blade removes any loose fibres picked up from the cloth, and any differently coloured paste lifted from previously printed regions of the fabric. The lint doctor thus minimises contamination of the colour box.
Engraved printing rollers come in various diameters depending upon the repeat distance for the print design. The iron rollers have a layer of electrochemically deposited copper. Photo-gravure engraving is the most widely used technique. It is highly specialised and usually done outside the paintwork. The roller is first coated with a thin layer of a photo-sensitive polymer. It is then wrapped with a diapositive film carrying the design for a given colour and rotated under a light source. Only the transparent areas of the film permit light passage and crosslinking of the polymer film. Washing removes the unreacted soluble polymer from the zones beneath the pattern, leaving the insoluble, crosslinked, acid-resistant polymer on the exposed surfaces. The exposed copper layer on the roller can then be etched with chemicals such as nitric acid or ferric chloride solution to form the recessed areas. The polymer film protects the non-pattern areas from attack.
One major problem in roller printing is the effect of the pressure of the print rollers on wet paste already deposited on the fabric surface. As a printed area
Cu + 4HNO3 Cu(NO3)2 + 2NO₂+ 2H₂O
Cu + 2Fe3+- Cu2+ + 2Fe2+
passes under the next roller, some paste is pressed further into the fabric and some sticks onto the roller and is removed. Both effects leave less paste on the fabric surface, thus reducing the colour strength. For this reason, pale colours are printed first, followed by successively deeper ones. In one modern machine, the print rollers consist of a thin metal shell mounted on a mandrel and forced against the fabric by air pressure using an inflatable bag. This allows the use of lower pressures so that the crushing effect is reduced. Other common printing faults include
(1) colour scratches parallel to the selvedges caused by particles in the paste scratching the print roller;
(2) strong, continuous lines of colour running up the cloth, called snaps. These arise from the lifting of the doctor blade by a thread or particle of dried thickener or a chipped blade;
(3) smearing of unwanted colour over the fabric, called scumming. This comes from poor cleaning of the engraved roller surface and is a particular problem in discharge printing
(4) colour depth variations because of fluctuations in the pressure applied to the print rollers.
Engraved roller printing of fabric more than 2 m wide is difficult because of the unlevel colours caused by the bowing of the rollers under pressure. Copper is a soft metal and print rollers may be chromium plated after engraving to ensure adequate endurance. Rollers can also be re-plated for new designs. Nevertheless, engraved rollers are expensive. Once the dominant printing technique, engraved roller printing has been superseded by rotary screen printing.
PRINTING STYLES
There are three different styles used to produce patterned effects on textiles
Direct Printing Style
Direct printing involves the transfer of paste-containing dyes to the appropriate areas of the fabric. This method involves the direct application of colour design to the fabric. The dyes used for direct printing are those that normally be used for the conventional dyeing of the fabric. This is the most widely used printing style of fabric
Discharge Printing Style
Discharge printing also called extract printing, method of applying a design to dye fabric by printing a colour-destroying agent such as chlorine or hydrosulphite, to bleach out a white or light pattern on the coloured ground
Resist Printing Style
- By applying a resist agent in the desired design, then dyeing the fabric in which the design remains white although the rest of the fabric is dyed
- By including a resist agent and a dye in the paste which is applied for the design, in which case the colour of the design is not affected by subsequent dyeing of the fabric
Difference Between Dyeing and Printing
Dyeing
- Dye is applied to the whole fabric equally
- Fabric, yarn and fibre are dyed by dyeing
- Dyeing is applied on both sides of the fabric
- No precise design required
- Only one dye is used
- Precise temperature is required
- Huge amount of water is required
- Cheap
- Dyes Solution
- Soft
Printing
- Dyes are applied to the fabric to produce the desired design
- Printing is done on fabric
- Dyes are applied on one side of the fabric
- Design must be needed for printing
- One or more dye is used
- Precision temperature is not required
- A small amount of water
- Costly
- Printing paste
- Harsh



Comments
Post a Comment