Garment Manufacturing Process Flow Chart

Garment Manufacturing Process Flow Chart
Garment Manufacturing
Garment Manufacturing is the process from getting the order from the buyer to the delivery of the goods to the buyer through various processes, and techniques. Getting a PO (Purchase Order) from the buyer is the first step of manufacturing. Various departments are involved in completing the goods manufacturing process such as CAD, cutting, IE, sewing, merchandising, planning, etc.
Garment Manufacturing Processes Details:
Design:
In the clothing industry, design means determining the shape of each part of a garment. The buyer gives the design to the merchandiser as a technical sheet or BOM (Bill of Material. It can be sent by both manually or by computer. It is made in the CAD department. CAD means computer-aided design. In the apparel industry, CAD systems are mainly used for garment design, Pattern Preparation, Pattern Grading Marker Making, etc.
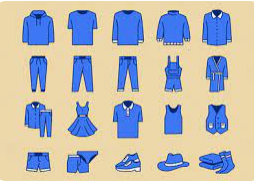 |
| Fig: Garments Design |
Pattern Making:
By following the technical sheet each part of a garment's pattern is made by software and a plotter machine. Patterns need to make a set of templates of different components of garments for cutting. It also makes to minimize wastage and produce specific shape and quality of garments.
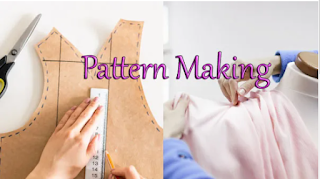 |
| Fig: Pattern Making |
Sample Making: 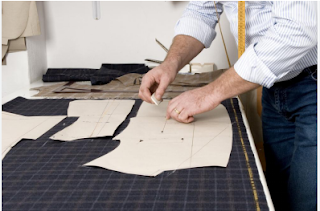
Fig: Sample Making
The sample is made by following the buyer given full instructions. After making the sample it is sent to the buyer. There are various types of samples in garments:
- Approved Sample: The sample that is approved by the buyer is called the approved sample
- Counter Sample: The manufacturers produce several numbers of the samples following the approved sample which is known as counter sample
- Salesman Sample: The sample that is made for market appraisal or marketing purposes, then it is called a Salesman sample.
- Photo Sample: This sample is made for modeling. It is worn by the model in the event of shooting for a catalog or fashion show.
- Mock-Up Sample: When any part of a garment is made for a particular purpose, not the complete garment then it is called a mock-up sample
- Pre-Production Sample: When the sample is made before starting production and then it to the buyer to get approval from the buyer for production is called a production sample
- Production Sample: When samples are made from the production floor and sent to the buyer for quality checking then it is called a production sample
- Size Set Sample: When samples are collected from the production floor for all the sizes and all colors and sent to the buyer for checking the fitting of all sizes and color matching then it is called a size set sample
- Shipping Sample: After final inspection, when samples are made from cartoons and sent to the buyer for checking then it is called a shipping sample.
Production Pattern Making:
During pattern-making allowance is added with each part of the garment size net dimension. It can be made both manually or by computer. Plotter machines are used to make production patterns. It is monitored by computer.
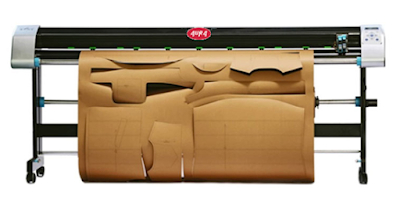 |
| Fig: Production Pattern Making with Plotter Machine |
Grading:
Grading means the stepwise increase or decrease of the size of the master pattern to create a small or large size. Grading alters the overall size of a design. If buyers require different sizes, then we need grading of the master pattern. It may be XS, S, M, L, XL, XXL, etc. Grading can be applied by two methods 1. Manual Method 2. Computerized Method.
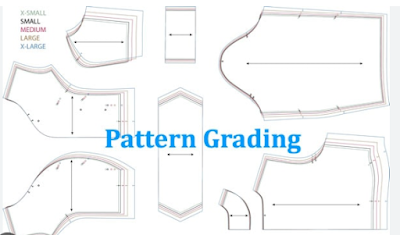 |
| Fig: Pattern Grading System in the Garments Industry |
Marker Making:
A marker is a thin piece of paper that contains all the parts of a garment. To make the cutting process easy marker must be used. It can be made manually or by using the computer.
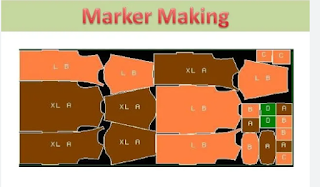 |
| Fig: Marker Making |
Fabric Spreading:
It is the process of spreading the fabric to cut as a layer. It can be done by both manual and computerized methods.
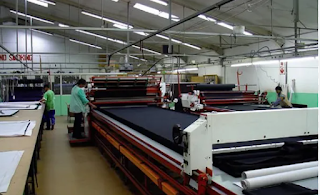 |
| Fig: Fabric Spreading |
Fabric Cutting:
According to marker paper fabric needs to be cut for bulk production sewing. There are mainly two types of cutting methods,
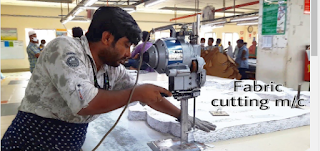 |
| Fig: Fabric Cutting |
1. Manual Cutting Method : - Scissor Cutting: Scissor cutting is done manually with scissors. The cutting master will cut this fabric to make samples. This cutting method is mainly used for sample-making. This is the first and oldest method of fabric cutting. It is used to cut one or more fabric plies. Fabric can be cut from right to left or left to right with this machine. High time & cost cosume with this machine. Mailly is used for tailoring or household purposes.

Fig: Scissor Cutting
- Round Knife Cutting: This machine has a base plate and electric motor to drive the machine. Handle the cutter to drive the machine. It has a rotating circular blade which helps to round cut. Blade diameter ranges from 6-20 cm. The blade is circular and driven by an electric motor. Circular knife width 1000-3500 cm.
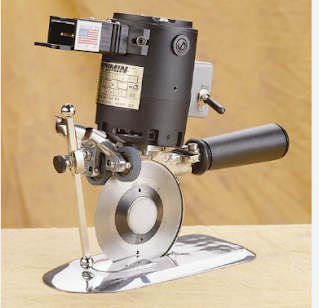
Fig: Round Knife Cutting Machine
- Band Knife Cutting: A band knife cutting machine consists of a series of pullets with an electric motor. Cutting knife is endless sharp and flexible. No need to sharpen this machine knife again after cutting. It has a narrower knife than the straight knife. This machine is motionless but the fabric is movable. This machine looks like a sawmill cutter.
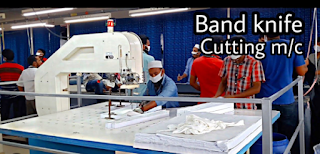
Fig: Band Knife Cutting Machine
- Straight Knife Cutting: This cutting is one of the most used cutting machines in the garment industry. An electric motor. base plate with roller, stand, handle, knife, knife guard, and wheel are the main components of the straight knife-cutting machine. An electric motor is used to run the machine. To sharpen the knife during cutting, a grinding wheel is used. Straight edge is mostly used to cut by this machine, Band edge, straight edge, wave edge saw edge, etc. are also cut with this machine. Blade width 2.5 to 4.5 cm. Heavy fabrics such as denim and canvas can also be cut with this machine.

Fig: Straight Knife Cutting Machine
- Dies Cutting: There are mainly two types of die cutting available. 1) Presses 2) Clickers. The blade, Ram head, Dye Motor, and operating system of the ram are the main parts of dies cutting machine. Metallic strips are used to make a die. Most useful for cutting small parts.
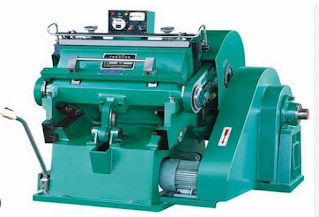
Fig: Dies Cutting
- Notcher Cutting: This type of machine is used in special cases. This machine is used to cut the edges of some components. To make a notch this machine was invented. This notch can be used in a U-shape or V-shape.

Fig: Notcher Cutting Machine
- Drill Cutting: This machine is used to mark the end of the components of the dress. It is mainly used for pocket and dart settings. The motor, base plate, work handle, guide, bit angle, switch, drill, and spirit level are the parts of drill cutting.
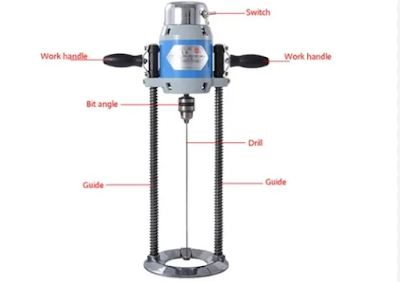
Fig: Fabric Drilling Machine
2. Computerized Cutting Method:- Straight Knife Cutting: This machine is controlled by computer cutting software. The cam-cutting machine does not require a marker to cut the fabric. Very fast and accurate cutting can be done with this machine. The cutting speed of this machine can be varied. It can be rotated and moved at any angle. It is suitable for bulk production. Cutting is done by computerized marker making. The vacuum process facilitates the cam cutting by compressing fabric. Less cutting defect and no possibility of blade deflection. A blade sharpener is attached to the machine and lowers the possibility of hazards. Marker not needed and low labor cost. Six to eight times faster cutting than the manual cutting method.
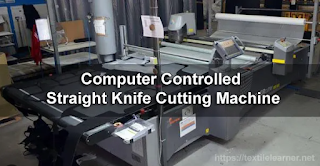
Fig: CAM Cutting Machine
- Water Jet Cutting: In this cutting system, a thin jet of water is passed through a nozzle at a very high speed. Water speed is 60000 pounds per square inch. Water is worked as both a hard and soft knife. A catcher in the bottom of the fabric lays which speed is as same as water jet.
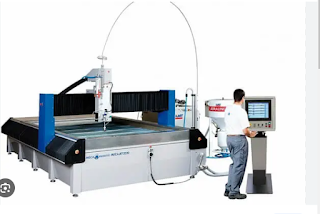
Fig: Water Jet Cutting Machine
- Laser Beam Cutting: In this method, fabric is cut by a ray of light. Spotlight radius is 0.25mm and it is very powerful. When the light ray falls on the material, it generates heat on the fabric which results in fabric cutting. Fabric cutting speed is 13 mm per minute. The computer controls the cutting head.
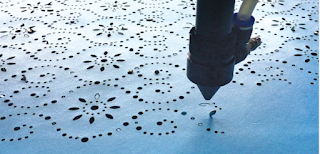
Fig: Laser Beam Cutting
- Plasma Torch Cutting: In this cutting method, cutting is done by a thin through the nozzle. One or more fabric plies can be cut at a time. Fabric is cut on a cutting table surface (85%) which must be placed in a perforated blanked place. This system is under research still now.
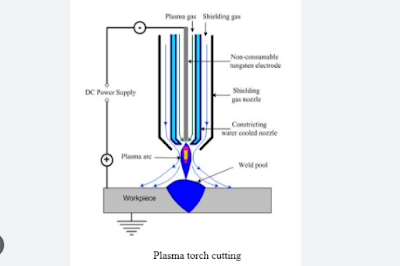
Fig: Ultrasonic and Plasma Torch Cutting
Cutting Parts Sorting or Bundling:
Cutting parts need to be sorted out and bundled after cutting to facilitate the sewing process. This process is done manually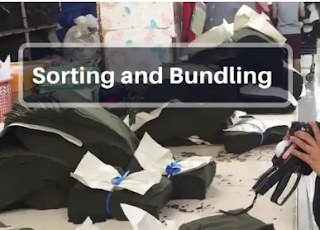
|
| Fig: Scissor Cutting |
|
| Fig: Round Knife Cutting Machine |
|
| Fig: Band Knife Cutting Machine |
|
| Fig: Straight Knife Cutting Machine |
|
| Fig: Dies Cutting |
|
| Fig: Notcher Cutting Machine |
|
| Fig: Fabric Drilling Machine |
- Straight Knife Cutting: This machine is controlled by computer cutting software. The cam-cutting machine does not require a marker to cut the fabric. Very fast and accurate cutting can be done with this machine. The cutting speed of this machine can be varied. It can be rotated and moved at any angle. It is suitable for bulk production. Cutting is done by computerized marker making. The vacuum process facilitates the cam cutting by compressing fabric. Less cutting defect and no possibility of blade deflection. A blade sharpener is attached to the machine and lowers the possibility of hazards. Marker not needed and low labor cost. Six to eight times faster cutting than the manual cutting method.
Fig: CAM Cutting Machine - Water Jet Cutting: In this cutting system, a thin jet of water is passed through a nozzle at a very high speed. Water speed is 60000 pounds per square inch. Water is worked as both a hard and soft knife. A catcher in the bottom of the fabric lays which speed is as same as water jet.
Fig: Water Jet Cutting Machine - Laser Beam Cutting: In this method, fabric is cut by a ray of light. Spotlight radius is 0.25mm and it is very powerful. When the light ray falls on the material, it generates heat on the fabric which results in fabric cutting. Fabric cutting speed is 13 mm per minute. The computer controls the cutting head.
Fig: Laser Beam Cutting - Plasma Torch Cutting: In this cutting method, cutting is done by a thin through the nozzle. One or more fabric plies can be cut at a time. Fabric is cut on a cutting table surface (85%) which must be placed in a perforated blanked place. This system is under research still now.
Fig: Ultrasonic and Plasma Torch Cutting
Cutting Parts Sorting or Bundling:
Cutting parts need to be sorted out and bundled after cutting to facilitate the sewing process. This process is done manually
Numbering:
Numbering needs to be done most of the time after the cutting and bundling process to prevent the goods from shading.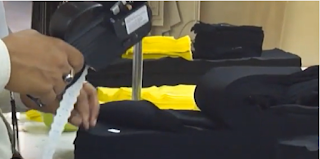
Sewing:
The process of joining fabric by the use of a needle and sewing thread is called sewing. All the parts of garments are joined here to make a complete garment. This process is done manually. The basic components of sewing are a needle, throat plate, pressure foot, feed dogs, and sewing thread, fabric, etc.
List of Sewing Machine
- Single Needle Lockstitch Sewing Machine
- Double Needle Lockstitch Machine
- Overlock Sewing Machine
- Interlock Sewing Machine
- Flat Lock Sewing Machine
- Flat Seam Sewing Machine
- Interlock Sewing Machine
- Bartack Machine
- Button Hole Machine
- Button Attach Machine
- The feed of the Arm Machine
- Kansai Machine
- BOK Machine
Garments Inspection:
After complete sewing, garments need to be checked to get defects-free garments to the buyer. This process is done manually.
 |
| Fig: Garment Inspection |
In this stage, the garments may be subjected to washing if necessary. There are mainly two types of washing (1) Dry process or Mechanical process (2) Wet process or Chemical Process
 |
| Fig: Garment Washing |
Pressing or Ironing:
The process by which unwanted creases and wrinkles are removed by calendering from the garments and the outlook of the garments is improved is called ironing or pressing.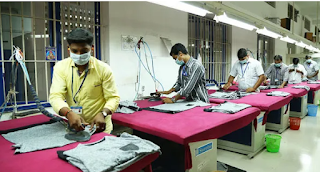
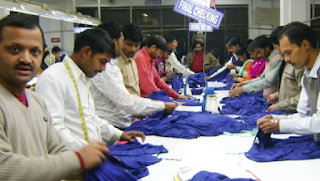
Final Inspection:
Finally, garments need to be checked according to the buyer's specifications. It is done by the buyer auditor manually
Packing:
Garments are packed here according to buyer-specified poly bags. This process is done by manual method.
Cartoning:
To minimize the damage to garments, all the garments need to be cartooned by following buyer instructions. It is done by manual method.
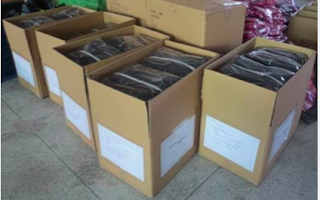 |
| Fig: Garments Cartoning |
Shipment:
After completing all the above processes the garments are sent to the buyer. 
Flow Chart or Sequence of Merchandising
1. 1.
Receive Order Details (Sketch or
Picture, Spec Sheet or Measurement Chart, Material Details)
2.
2. Consumption
3.
3. Costing
4. 4.
Negotiation with Buyer
5.
5. Order Receiving (P.O sheet
received) P.O =Purchase Order
6.
6. L/C Receiving
7.
7. Back To Back L/C opening ( For
purchasing Fabric and accessories)
8.
8. Samples Developing and Approving
9.
9. Approval for Bulk Production
10.
10. Related Work to Production
Planning
11.
11. Start Bulk Production
12.
12. Line Inspection
13.
13. Final Inspection by Buyer
14. 14. Shipment to Buyer
Flow Chart or Sequence of Fabrics Cutting
- Work Order Sheet
- Certification of Assortment
- Pattern Receiving from Pattern Section
- Pattern Checking
- Marker Making (According to Assortment or Order Sheet)
- Marker Checking
- Determine the Quantity of Spreading Cloth
- Calculate the Number of Layer per Cutting
- Number of Cutting Per Order
- Receiving Fabric from Store
- Fabric Spreading
- Putting Marker Paper on the Spreading Cloth
- Cutting
Flow Sequence of Fabric Inventory
- Received the Fabrics
- Inspection
- Physical Inventory
- Make the Swatch Card
- Prepare the Blanket Shade
- Head Segregation
- Issue Fabrics to Cutting Section
Flow Chart or Sequence of Accessories Inventory
- Received Accessories
- Inspection
- Physical Inventory
- Swatch Making
- Swatch Approval from Buyer
- Record the Entry
- Supply to the Sub-store (According to Demand)
- Use to Bulk Production
The sequence of CAD (Computer-Aided Design) for Garments
- Receiving Patterns
- Taking the Image of Pattern in CPU by Digitizer or Making the Patterns (CPU: Computer Processing Unit)
- Modernizing of All Pattern Parts by the Software (Moderizer)
- Pattern Grading by Software
- Aligning all sizes of patterns in the Marker by the Software (Diamino) (setting marker width, starting the point, and placing the patterns in the proper place by maintaining grain line)
- Completing the Marker
- Taking approval from the CAM (Computer Aided Manufacturing) section
- Print the Marker by Plotter
- Printed Marder is delivered to Cutting Section
Sequence of Cuff Making for Shirt
- Cuff Rolling
- Cuff Sewing
- Cuff Turning
- Cuff Finishing
- Cuff Stitching
- The cuff's Button Hole Stitching
- Cuff's Button Attach Stitching
- Inspection
- Counting and Bundling
- Delivery to Body Section (Shirt)
Sequence of Collar Making for Shirt
- Front and Back Fitting
- Stay Sewing
- Sewing(Collar)
- Point Cutting
- Turning
- Forming
- Finishing
- Collar Stitching
- Collar Bottom Cutting
- Band Rolling
- Spec-Adjusting
- Band Attach Sewing
- Band Edge Cutting
- Band Forming
- Band Attach Stitching
- Band Bottom Cutting
- Collar Position Marking
- Button Hole Stitching
- Button Attach Stitching
- Inspection and Counting
- Delivery to Body Section
Flow Chart /Sequence of Body(shirt) Making
- Top Center
- Over Locking
- Button Hole Stitching
- Button Attach Stitching
- Pocket Folding
- Pocket Attach Stitching
- Upper and Lower Front Fitting
- Label Attach Stitching
- Back Yoke Attach Sewing
- Front and Yoke attach sewing
- Genbol Attach Sewing
- Bar-tacking
- Sleeve Attach Sewing
- Side Seam Sewing
- Bottom Rolling/ Hemming
- Collar Attach Sewing
- Collar Attach Stitching
- Inspection
- Counting
- Delivery to Body Section
Sequence/ Flow Chart of Sweater Manufacturing
- Winding
- Knitting
- First Inspection
- Linking
- Trimming and Mending
- Second Inspection
- Washing
- Hydro-extracting
- Drying
- Ironing
- Label Attaching
- Third Inspection
- Poly Packing
- Cartoning
- Inspection by Buyer
- Shipment
Flow Chart/ Sequence of T-Shirt Manufacturing (Sewing)
- Receive Fabric from Cutting Section
- Shoulder Joining by Overlock Machine
- Shoulder Top Stitching by Flat Lock Machine
- Rib/Neck Joining by Overlock Machine (Rib Sewing for neck by single needle machine, Rib rounding by single needle machine)
- Neck Top Stitching By Flat Lock Sewing Machine
- Sleeve Hemming By Overlock Machine
- Sleeve Joing with Body by Overlock Machine
- Side Seaming with Label by Overlock Machine
- Bottom Hemming by Flatlock Machine
- Inspection
- Delivery to Finishing Section
Flow Chart/Flow Sequence of Polo Shirt Sewing
1) Collar Making by Flat Knitting Machine
If the collar is made of fabric then we have to follow the following process
- Interlining Attach on the Front part of Collar
- Sewing Mark Around The Collar
- Sewing the Two Part of Collar
- Collar Edge cutting
- Collar Turning
- Top Stitch Around the Collar
- Collar Bottom Cutting
- Mark the Point of the Collar
2) Placket Making
- Interlining Attach on Placket with Iron
- Top Stitch on Placket in Length Direction
- Bottom Sewing Mark
3) Sleeve Making
- Sleeve Hemming
- Side Seam of Sleeve
- Turning of Sleeve
4) Body Making and Assembling
- Shoulder Join with Tape
- The placket Attached to the Body
- Button Hole on Upper Placket
- Right Side Seam
- Bottom Hemming
- Left Side Seam with Care Label
- Both Sleeve Attach
- Collar Join
- Back Taping
- Bottom Tack
Flow Chart of Finishing (Shirt)
- Garments
- Thread Trimming
- Fanning
- Collar Press
- Ironing
- Folding
- Inspection
- Polypack
- Sorting
- Assorting
- Cartoning
- Store
Flow Chart of Boxer by Flat Seam Machine
- Heat Seal Attach
- Pouch join (Overlock)
- Pouch Tack (Single Needle)
- Side Lap Join (Flat Seam)
- Inseam Lap Join (Flat Seam)
- Back Lap Join (Flat Seam)
- Ultrasonic Elastic Cut
- Make Waist Ringer (Waist Brtk)
- Waist Ringer Join to Waist (Flatlock Roller)
- Leg Binding (Flatlock Folder)
- Inseam Pullout (Overlock)
- Inseam Top Stitch (Flat Seam)
- Leg Bartack (Bartack)
- Quality Check (Checker)
Flow Chart of Boxer by Overlock
- Heat Seal Attach
- Pouch Join (Overlock)
- Side Panel Join (Overlock)
- Back Panel Join (Overlock)
- Elastic Cut by Chopper
- Make Waist Ringer (Bartack)
- Attach Waist Ringer at Waist Position (Flatlock Roller)
- Inseam Close (Overlock)
- Mobillon Attach (Overlock)
- Bottom Hemm (Flatlock) one side
- Bottom Hemm (Flatlock) another side
- Quality Check by Checker
Process Flow Chart of Jacket Manufacturing Click Here
To Know How to Produce Jeans Pant Click Here


Comments
Post a Comment